Media and tray
This chapter provides information on how to load print media into your machine.
Selecting print media
You can print on a variety of print media, such as plain paper, envelopes, and labels. Always use print media that meet the guidelines for use with your machine.
Print media that does not meet the guidelines outlined in this user’s guide may cause the following problems:
-
Poor print quality
-
Increased paper jams
-
Premature wear on the machine.
Properties, such as weight, composition, grain, and moisture content, are important factors that affect the machine’s performance and the output quality. When you choose print materials, consider the following:
-
The type, size, and weight of the print media for your machine are described in print media specifications (see Print media specifications ).
-
Desired outcome: The print media you choose should be appropriate for your project.
-
Brightness: Some print media are whiter than others and produce sharper, more vibrant images.
-
Surface smoothness: The smoothness of the print media affects how crisp the printing looks on the paper.
|
|
|
|
|
|
|
|
|
|
|
|
The use of flammable media or foreign materials left in the printer may lead to overheating of the unit and, in rare cases may cause a fire. |
The amount of paper put into the tray may differ according to media type used (see Print media specifications ).

-
Tray extend lever
-
Paper length guide
-
Paper width guide
-
Paper limit mark
|
|
|
|
If you do not adjust the guide, it may cause paper registration, image skew, or jamming of the paper. |
Changing the tray size
To change the size, you need to adjust the paper guides.
To change the size to A4 or Letter
The tray is preset to Letter or A4 size, depending on your country. You must adjust the lever and paper width guide properly.
-
Pull the tray out of the machine. Remove paper from the tray if necessary.
-
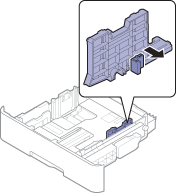
If you want to change the size to Letter, hold the lever at the back of the tray, and rotate the lever clockwise.

-
Squeeze the paper width guide and slide it to the edge of the lever.
![[Note]](../../common/icon_note.png)
If you want to change the size to A4, first move the paper width guide to left and rotate the lever counterclockwise. If you force the lever, it could damage the tray.
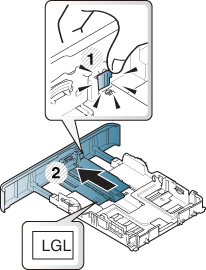
To change the size to Legal (LGL)
Push button as shown and pull out the tray.
|
|
|
|
Illustrations on this user’s guide may differ from your machine depending on its options or models. Check your machine type (see Front view). |
|
|
|
|
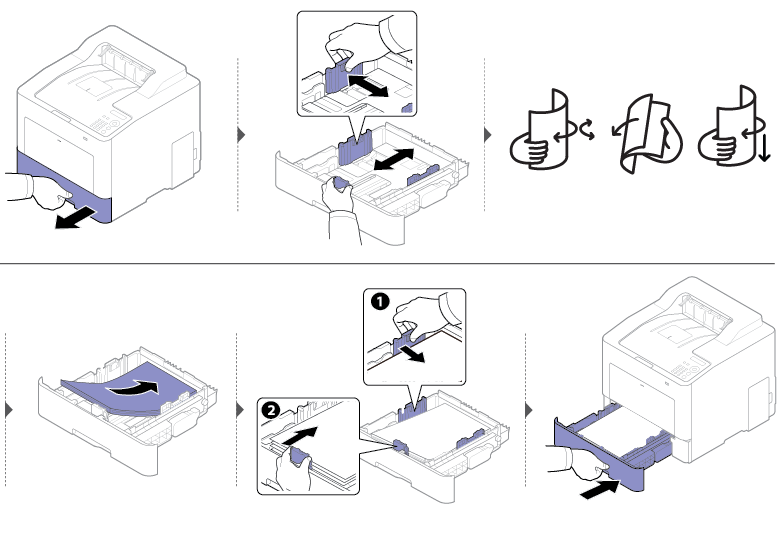
When you print a document, set the paper type and size for the tray (see Setting the paper size and type).
The multi-purpose tray can hold special sizes and types of print material, such as postcards, note cards, and envelopes (see Print media specifications ).
-
Load only one type, size and weight of print media at a time in the multi-purpose tray.
-
To prevent paper jams, do not add paper while printing when there is still paper in the multi-purpose tray. This also applies to other types of print media.
-
Always load the specified print media only to avoid paper jams and print quality problems (see Print media specifications ).
-
Flatten any curl on postcards, envelopes, and labels before loading them into the multi-purpose tray.
|
|
|
|
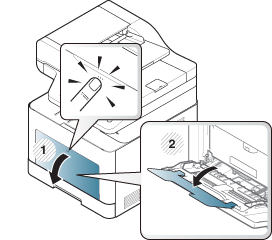
When you print a document, set the paper type and size for the multi-purpose tray.
For information about setting the paper type and size on the control panel (see Setting the paper size and type).
The paper setting in the machine and driver should match to print without a paper mismatch error.
-
You change the paper setting set in the machine from Samsung Easy Printer Manager program or SyncThru™ Web Service.
-
If your machine is connected to the local, you can set the machine’s setting from Samsung Easy Printer Manager > > (see Using Samsung Easy Printer Manager).
-
If your machine is connected to the network, you can set the machine’s setting from SyncThru™ Web Service > tab > (see SyncThru™ Web Service).
-
-
You change the paper setting set in the machine using control panel.
-
Select
 () > > > or on the control panel.
-
-
You change the paper setting set in the machine using printer driver.
-
Set the paper type from the window > tab > (see Opening printing preferences).
-
|
|
|
|
To see for paper weights for each sheet, refer to Print media specifications .
|
Types |
Tray 1 |
Optional tray |
Multi-purpose tray |
|---|---|---|---|
|
|
● |
● |
● |
|
|
● |
● |
● |
|
|
● |
● |
● |
|
|
● |
● |
|
|
|
● |
● |
● |
|
|
● |
● |
● |
|
|
● |
● |
● |
|
|
● |
● |
● |
|
|
● |
● |
● |
|
|
● |
● |
|
|
|
● |
● |
|
|
|
● |
● |
|
|
|
● |
● |
● |
|
|
● |
● |
● |
|
|
● |
● |
● |
|
|
● |
● |
● |
|
|
● |
● |
● |
|
|
● |
● |
(●: Supported, Blank: Not supported)
Printing successfully on envelopes depends upon the quality of the envelopes.
To print an envelope, place it as shown in the following figure.
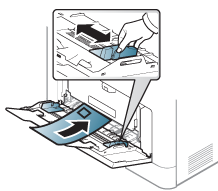
-
When selecting envelopes, consider the following factors:
-
Weight: should not exceed 90 g/m2 otherwise; jams may occur.
-
Construction: should lie flat with less than 6 mm curl and should not contain air.
-
Condition: should not be wrinkled, nicked, nor damaged.
-
Temperature: should resist the heat and pressure of the machine during operation.
-
-
Use only well-constructed envelopes with sharp and well-creased folds.
-
Do not use stamped envelopes.
-
Do not use envelopes with clasps, snaps, windows, coated lining, self-adhesive seals, or other synthetic materials.
-
Do not use damaged or poorly made envelopes.
-
Be sure the seam at both ends of the envelope extends all the way to the corner of the envelope.

-
Acceptable
-
Unacceptable
-
-
Envelopes with a peel-off adhesive strip or with more than one flap that folds over to seal must use adhesives compatible with the machine’s fusing temperature for 0.1 second about 170 °C (338 °F). The extra flaps and strips might cause wrinkling, creasing, or jams, and may even damage the fuser.
-
For the best print quality, position margins no closer than 15 mm from the edges of the envelope.
-
Avoid printing over the area where the envelope’s seams meet.
To avoid damaging the machine, use only labels designed for use in laser printers.

-
When selecting labels, consider the following factors:
-
Adhesives: Should be stable at your machine’s fusing temperature about 170 °C (338 °F).
-
Arrangement: Only use labels with no exposed backing between them. Labels can peel off sheets that have spaces between the labels, causing serious jams.
-
Curl: Must lie flat with no more than 13 mm of curl in any direction.
-
Condition: Do not use labels with wrinkles, bubbles, or other indications of separation.
-
-
Make sure that there is no exposed adhesive material between labels. Exposed areas can cause labels to peel off during printing, which can cause paper jams. Exposed adhesive can also cause damage to machine components.
-
Do not run a sheet of labels through the machine more than once. The adhesive backing is designed for only a single pass through the machine.
-
Do not use labels that are separating from the backing sheet or are wrinkled, bubbled, or otherwise damaged.
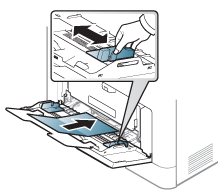
-
In the software application, set the margins to at least 6.4 mm (0.25 inches) away from the edges of the material.
When loading preprinted paper, the printed side should be facing up with an uncurled edge at the front. If you experience problems with paper feeding, turn the paper around. Note that print quality is not guaranteed.
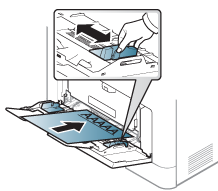
-
Must be printed with heat-resistant ink that will not melt, vaporize, or release hazardous emissions when subjected to the machine’s fusing temperature for 0.1 second about 170 °C (338 °F).
-
Preprinted paper ink must be non-flammable and should not adversely affect machine rollers.
-
Before you load preprinted paper, verify that the ink on the paper is dry. During the fusing process, wet ink can come off preprinted paper, reducing print quality.
After loading paper in the paper tray, set the paper size and type.
The paper setting in the machine and driver should match to print without a paper mismatch error.
-
You change the paper setting set in the machine from Samsung Easy Printer Manager program or SyncThru™ Web Service.
-
If your machine is connected to the local, you can set the machine’s setting from Samsung Easy Printer Manager > > (see Using Samsung Easy Printer Manager).
-
If your machine is connected to the network, you can set the machine’s setting from SyncThru™ Web Service > tab > (see SyncThru™ Web Service).
-
-
You change the paper setting set in the machine using control panel.
-
Select
 () > > > or on the control panel.
-
|
|
|
|
If you want to use special-sized paper such as billing paper, select the tab > > and set in the (see Opening printing preferences). |
|
|
|
|
The surface of the output tray may become hot if you print a large number of pages at once. Make sure that you do not touch the surface, and do not allow children near it. |
The printed pages stack on the output support, and the output support will help the printed pages to align. Unfold the output support.

|
|
|
|
Illustrations on this user’s guide may differ from your machine depending on its options or models. Check your machine type (see Front view). |

