Using USB memory device
This chapter explains how to use a USB memory device with your machine.
|
|
|
|
This USB memory device is supported for M387x/ M407x series (see Various features). |
About USB memory
USB memory devices are available with a variety of memory capacities to give you more room for storing documents, presentations, downloaded music and videos, high resolution photographs or whatever other files you want to store or move.
You can do the following tasks on your machine by using a USB memory device.
-
Scan documents and save them on a USB memory device
-
Print data stored on a USB memory device
-
Restore backup files to the machine’s memory
-
Format the USB memory device
-
Check the available memory space
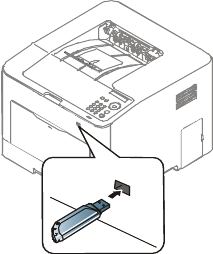
Plugging in a USB memory device
The USB memory port on the front of your machine is designed for USB V1.1 and USB V2.0 memory devices. Your machine supports USB memory devices with FAT16/FAT32 and a sector size of 512 bytes.
Check your USB memory device’s file system from your dealer.
You must use only an authorized USB memory device with an A plug connector.
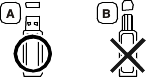
Use only a metal‐shielded USB memory device.

Only use a USB memory device that has obtained compatibility certification; otherwise, the machine might not recognize it.
|
|
|
|
|
|
|
|
You can scan a document and save the scanned image onto a USB memory device.
Scanning
-
Insert a USB memory device into the USB memory port on your machine.
-
Place a single document face down on the document glass, or load the documents face up into the document feeder (see Loading originals).
-
Select
 (scan) > > on the control panel.
OR
For the model with a touch screen, select
 () > > > on the touch screen.
The machine begins scanning.
-
After scanning is complete, you can remove the USB memory device from the machine.
Customizing Scan to USB
You can specify image size, file format, or color mode for each scanning to USB job.
-
Select
(scan) >  () > > on the control panel.
OR
For the model with a touch screen, select
 ) > >
) > >  (Option
settings) on the touch screen.
(Option
settings) on the touch screen. -
Select the setting option you want appears.
For the model with a touch screen, select the option you want using arrows.
![[Note]](../../common/icon_note.png)
Some features may not be available depending on model.
-
: Sets the image size.
-
: Sets the original document’s.
-
: Sets the image resolution.
-
: Sets the color mode. If you select in this option, you cannot select JPEG in .
-
: Sets the file format in which the image is to be saved. When you select or , you can select to scan multiple pages. If you select in this option, you cannot select in .
-
: Sets the duplex mode.
-
: Sets the brightness level to scan an original.
-
-
Select the desired status you want and press .
For the model with a touch screen, press
 (back) to
go back to the previous screen. Go to step 5.
(back) to
go back to the previous screen. Go to step 5. -
Repeat steps 2 and 3 to set other setting options.
-
Press
 ( or ) button
or home (
( or ) button
or home ( ) icon
to return to ready mode.
) icon
to return to ready mode.
You can directly print files stored on a USB memory device.
File is supported by Direct Print option.
-
PRN: Only files created by provided driver with your machine are compatible.
If you print PRN files created from other machine, the printout would be different.
-
TIFF: TIFF 6.0 Baseline
-
JPEG: JPEG Baseline
-
PDF: PDF 1.7 or lower version.
To print a document from a USB memory device
-
Insert a USB memory device into the USB memory port on your machine, and then press > on the control panel.
OR
For the model with a touch screen, select
) > > on
the touch screen. -
Select the folder or file you want and press . If you see [+] or [D] in the front of a folder name, there are one or more files or folders in the selected folder.
For the model with a touch screen, select the folder or file you want.
-
Select the number of copies to be printed or enter the number.
-
Press, or to start printing the selected file. After printing the file, the display asks if you want to print another job.
For the model with a touch screen, press on the touch screen. Go to step 6.
-
Press when appears to print another job, and repeat from step 2.
Otherwise, press the arrows to select and press .
-
Press
( or ) button
or home () icon
to return to ready mode.
Data in the machine’s memory can be accidentally erased due to power failure or storage failure. Backup helps you protect the system settings by storing them as backup files on a USB memory device.
Backing up data
-
Insert the USB memory device into the USB memory port on your machine.
-
Select
() > > > on
the control panel.OR
For the model with a touch screen, select
 (Setup) > > >> on the touch screen.
 -
Select or .
-
Select the file you want to back up.
-
Press or when the confimation window appears.
-
Press
( or ) button
or home () icon
to return to ready mode.
Restoring data
-
Insert the USB memory device on which the backup data is stored in to the USB memory port.
-
Select
() > > > on
the control panel.OR
For the model with a touch screen, select
(Setup)> > > > on the touch screen. -
Select , .
-
Select the file you want to restore.
-
Press or when the confimation window appears.
-
Press
( or ) button
or home () icon
to return to ready mode.
You can delete image files stored on a USB memory device one by one or all at once by reformatting the device.
|
|
|
|
If you see [+] or [D] in the front of a folder name, there are one or more files or folders in the selected folder. |
|
|
|
|
After deleting files or reformatting a USB memory device, files cannot be restored. Therefore, confirm that you no longer need the data before deleting it. |
Deleting an image file
-
Insert a USB memory device into the USB memory port on your machine.
-
Press > > on the control panel.
OR
For the model with a touch screen, select
) > > >
select the folder or file you want > (Option settings) > on the touch screen. -
Press or when the confimation window appears.
-
Press
( or ) button
or home () icon
to return to ready mode.
Formatting a USB memory device
-
Insert a USB memory device into the USB memory port on your machine.
-
Select > > on the control panel.
OR
For the model with a touch screen, select
) > > >
select the folder or file you want > (Option settings) > on the touch screen. -
Press or when the confimation window appears.
-
Press
( or ) button
or home () icon
to return to ready mode.
Viewing the USB memory status
You can check the amount of memory space available for scanning and saving documents.
-
Insert a USB memory device into the USB memory port on your machine.
-
Select > > on the control panel.
OR
For the model with a touch screen, select
) > > on
the touch screen. -
The available memory space appears on the display.
-
Press
( or ) button
or home () icon
to return to ready mode.