|
|
|
|
-
Click the Windows menu.
-
For Windows 8, from the , select > .
-
-
For Windows XP/Server 2003, select .
-
For Windows Server 2008/Vista, select > > .
-
For Windows 7/8, select > .
-
For Windows Server 2008 R2, select > > .
-
-
Right‐click on your machine.
-
For Windows XP/Server 2003/Server 2008/Vista, select .
For Windows 7/8 or Windows Server 2008 R2, from context menus, select .
![[Note]](../../common/icon_note.png)
If has a ►, you can select other printer drivers connected to the selected printer.
-
Change the settings on each tab.
-
Click .
|
|
|
|
If you want to change the settings for each print job, change it in . |
-
Click the Windows menu.
-
For Windows 8, from the , select > .
-
-
For Windows XP/Server 2003, select .
-
For Windows Server 2008/Vista, select > > .
-
For Windows 7/8, select > .
-
For Windows Server 2008 R2, select > > .
-
-
Select your machine.
-
Right‐click your machine and select .
For Windows 7 or Windows Server 2008 R2, if has a ►, you can select other printer drivers connected to the selected printer.
Using advanced print features
|
|
|
|
XPS printer driver : used to print XPS file format.
|
You will sometimes need to save the print data as a file.
-
Check the box in the window.
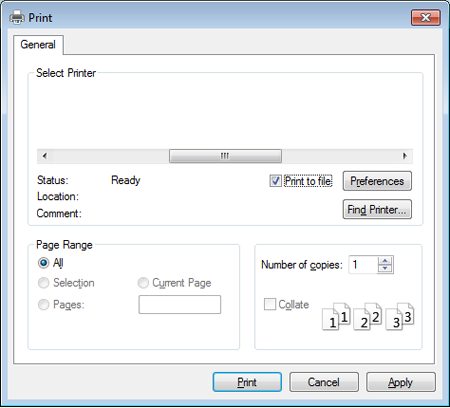
-
Click .
-
Type in the destination path and the file name, and then click .
For example, c:\Temp\file name.
If you type in only the file name, the file is automatically saved in , , or . The saved folder may differ, depending on your operating system or the application you are using.
You can use advanced printing features when using your machine.
To take advantage of the printer features provided by your printer driver, click or in the application’s window to change the print settings. The machine name, that appears in the printer properties window may differ depending on the machine in use.
|
|
|
|
|
Item |
Description |
||||||
|---|---|---|---|---|---|---|---|
|
|
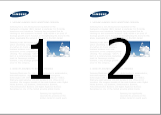
Selects the number of pages to print on a single sheet of paper. To print more than one page per sheet, the pages will be reduced in size and arranged in the order you specify. You can print up to 16 pages on one sheet. |
||||||
|
|
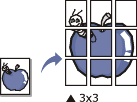
Prints a single‐page document onto 4 (Poster 2x2), 9 (Poster 3x3), or 16 (Poster 4x4) sheets of paper, for the purpose of pasting the sheets together to form one poster‐size document. Select the value. Specify in millimeters or inches by selecting the radio button on the upper right of tab to make it easier to paste the sheets together. 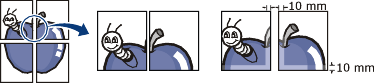
|
||||||

|
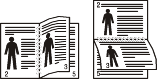
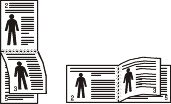
Prints your document on both sides of a sheet of paper and arranges the pages so that the paper can be folded in half after printing to produce a booklet.
|
||||||
|
|
Print on both sides of a sheet of paper (duplex). Before printing, decide how you want your document oriented.
|
||||||
|
|
|
||||||
|
|
Changes the size of a document to appear larger or smaller on the printed page by entering in a percentage by which to enlarge or decrease the document. |
||||||
|
|
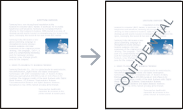
The watermark option allows you to print text over an existing document. For example, you use it when you want to have large gray letters reading ”” or ”” printed diagonally across the first page or all pages of a document. |
||||||
|
|
|
||||||
|
|
|
||||||
|
|
|
||||||
|
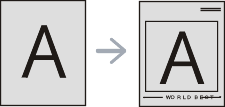
This option is available only when you use the PCL/SPL printer driver (see Software). An overlay is text and/or images stored in the computer hard disk drive (HDD) as a special file format that can be printed on any document. Overlays are often used to take the place of letterhead paper. Rather than using preprinted letterhead, you can create an overlay containing exactly the same information that is currently on your letterhead. To print a letter with your company’s letterhead, you do not need to load preprinted letterhead paper in the machine: just print the letterhead overlay on your document. To use a page overlay, you must create a new page overlay containing your logo or image.
|
||||||
|
|||||||
|
|||||||
|
|||||||
|
|
|
||||||
|
|
This option allows you to print with the given permission.
|
||||||
|
[a] This option is not available when you use XPS driver. |
|||||||

|
|
|
|
What is Direct Printing Utility?
Direct Printing Utility is a program that sends the PDF files directly to your machine to print without having to open the file.
To install this program:
Download the software from the Samsung website then unpack and install it: (http://www.samsung.com > find your product > Support or Downloads).
|
|
|
|
Printing
There are several ways you can print using the Direct Printing Utility.
-
From the menu select or .
-
For Windows 8, from , select > .
-
-
Find Samsung Printers > Direct Printing Utility.
-
Select your machine from the drop‐down list and click .
-
Select the file you wish to print and click .
The file is added in the section.
-
Customize the machine settings for your needs.
-
Click . The selected PDF file is sent to the machine.
Using the right‐click menu
-
Right‐click on the PDF file to print and select .
The Direct Printing Utility window appears with the PDF file is added.
-
Select the machine to use.
-
Customize the machine settings.
-
Click . The selected PDF file is sent to the machine.
|
|
|
|
Some features may not be available depending on models or options. It means that the features are not supported. |
Printing a document
When you print with a Mac, you need to check the printer driver settings in each application you use. Follow the steps below to print from a Mac:
-
Open the document to print.
-
Open the menu and click ( in some applications).
-
Choose your paper size, orientation, scaling, other options, and make sure that your machine is selected. Click .
-
Open the menu and click .
-
Choose the number of copies and indicate which pages to print.
-
Click .
Changing printer settings
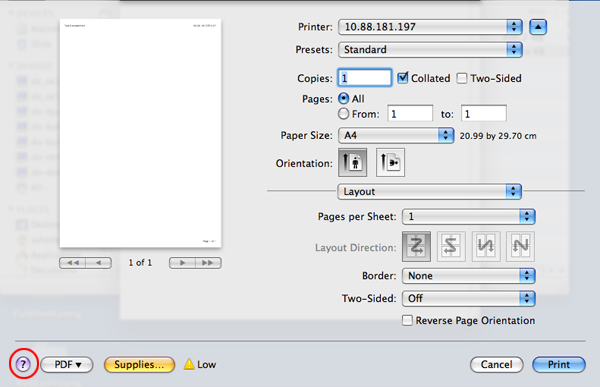
You can use advanced printing features when using your machine.
Open an application and select from the menu. The machine name, which appears in the printer properties window, may differ depending on the machine in use. Except for the name, the composition of the printer properties window is similar to the following.
You can print more than one page on a single sheet of paper. This feature provides a cost‐effective way to print draft copies.
-
Open an application, and select from the menu.
-
Select from the drop‐down list under . In the drop‐down list, select the number of pages you want to print on one sheet of paper.
-
Select the other options to use.
-
Click .
The machine prints the selected number of pages to print on one sheet of paper.
|
|
|
|
Some features may not be available depending on models or options. It means that the features are not supported (see Various features). |
Before printing in the duplex mode, decide on which edge you will be binding your finished document. The binding options are, as follows:
-
: This option is the conventional layout used in book binding.
-
: This option is the type often used with calendars.
-
From your Mac application, select from the menu.
-
Select from the drop‐down list under .
-
Select a binding orientation from the option.
-
Select the other options to use.
-
Click and the machine prints on both sides of the paper.
|
|
|
|
If you print more than 2 copies, the first copy and the second copy might print on the same sheet of paper. Avoid printing on both sides of paper when you are printing more than 1 copy. |
|
|
|
|
Some features may not be available depending on models or options. It means that the features are not supported. |
Printing from applications
There are a lot of Linux applications that allow you to print using Common UNIX Printing System (CUPS). You can print on your machine from any such application.
-
Open the document to print.
-
Open the menu and click ( for someapplications).
-
Choose your paper size, orientation, and makesure that your machine is selected. Click .
-
Open the menu and click .
-
Select your machine to print.
-
Choose the number of copies and indicate which pages to print.
-
Change other printing options in each tab, if necessary.
-
Click .
Automatic/manual duplex printing may not be available depending on models. You can alternatively use the lpr printing system or other applications for odd‐even printing (see Features by models).
Printing files
You can print text, image, pdf files on your machine using the standardCUPS directly from the command line interface. The CUPS lp or lpr utility allows you to do that. You can print these files by using below command format.
"<printer name><option> <file name>"
Please refer to lp or lpr man page on your system for more details.
Using the window provided by the , you can change the various properties for your machine as a printer.
-
Open the .
If necessary, switch to .
-
Select your machine on the available printers list and click .
-
The window appears.
The following five tabs display at the top of the window:
-
: Allows you to change the printer location and name. The name entered in this tab displays on the printer list in .
-
: Allows you to view or select another port. If you change the machine port from USB to parallel or vice versa while in use, you must re‐configure the machine port in this tab.
-
: Allows you to view or select another machine driver. By clicking , you can set the default device options.
-
: Shows the list of print jobs. Click to cancel the selected job and select the check box to see previous jobs on the job list.
-
: Shows the class that your machine is in. Click to add your machine to a specific class or click to remove the machine from the selected class.
-
-
Click to apply the changes and close the window.
|
|
|
|
Some features may not be available depending on models or options. It means that the features are not supported (see Features by models). |
Proceeding the print job
After installing the printer, choose any of the image, text, or PS files to print.
-
Execute ”” command.
For example, if you are printing ””
document1
This will open the UNIX Printer Driver in which the user can select various print options.
-
Select a printer that has been already added.
-
Select the printing options from the window such as .
-
Select how many copies are needed in .
To take advantage of the printer features provided by your printer driver, press .
-
Press to start the print job.
Changing the machine settings
The UNIX printer driver in which the user can select various print options in printer .
The following hot keys may also be used: ”H” for , ”O” for , ”A” for , and ”C” for .
tab
-
: Set the paper size as A4, Letter, or other paper sizes, according to your requirements.
-
: Choose the type of the paper. Options available in the list box are , , and .
-
: Select from which tray the paper is used. By default, it is .
-
: Select the direction in which information is printed on a page.
-
: Print on both sides of paper to save paper.
Automatic/manual duplex printing may not be available depending on models. You can alternatively use the lpr printing system or other applications for odd‐even printing.
-
: Print several pages on one side of the paper.
-
: Choose any of the border styles (e.g., , )
tab
In this tab, you can change the brightness, resolution, or image position of your document.
tab
Set the character margin, line space, or the columns of the actual print output.
tab
-
: Set the margins for the document. By default, margins are not enabled. The user can change the margin settings by changing the values in the respective fields. Set by default, these values depend on the page size selected.
-
: Change the units to points, inches, or centimeters.
tab
Select various options in the and frames to customize various settings. These options are specific to the printer and depend on the PPD file.